Thursday

1960 Fender Jazzmaster Guitar Repair

Are You Nuts?


Someone got a bit too creative here, can you spot the problem?
What seems to be the problem with this Jazzmaster?
First ...Do No Harm ...

It's not at all surprising to see something like this on an inexpensive guitar, but when modifications are made that can effect the value of a collectible or vintage instrument you have to stop and ask if they are absolutely necessary. I don't believe there's any question here. :)

Mo' Better!
Apparently a suitable replacement nut was not available (and we all know just how rare Fender style nuts are, lol) so an acoustic guitar nut was used instead.

In order to "make it work", the original nut slot had been enlarged to accommodate the wider acoustic guitar nut. Performing a nut replacement is not difficult, however, this compromise turned an otherwise simple repair into a costly re-repair.

After removing the nut I cleaned the slot and filled it with a splice of matching rosewood. The fingerboard length (distance between the first fret and the end of the fingerboard) was measured before re-cutting the nut slot.

Fret spacing and the correct positioning of the nut and saddle(s) are all necessary for proper intonation. This is why saddle slots, fret slots and nut placement are all performed using precise measurements.

Tusq (aka Graph Tech) makes a variety of high quality, pre-slotted nuts suitable for replacement on Fender Strat's, Tele's, Jazzmaster's, Basses and many others. Purchasing the correct pre-slotted nut helps insure E to E spacing is correct and the strings are properly spaced. When installing a pre-made nut, slot depth is adjusted after the nut is installed. Special files matching the diameter of the strings are used to cut the depth and width of the pre-slotted nut so they match the strings precisely.
Graph Tech TUSQ XL Fender-Style Slotted Nut - Aged White
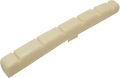
Pre-slotted Nut for Fender


The Finished Repair


Fortunately this repair is difficult to spot and the damage has been un-done. Recently I've seen a couple of Fender Stratocasters that were damaged when someone tried to remove the nut and took large chuncks of fingerboard out with it. As theses are generally not difficult to remove I would have to blame the technique rather than the instruments. For a more detailed look at removing, replacing and adjusting nuts see my website.


Fill is barely noticeable and would only be spotted if one knew to look for it.


Wednesday

Drilling Holes w/o Chipping Paint

Most electric guitar replacement bodies come without pre-drilled holes for mounting the pickguard, tremolo cover and other trim. Unfortunately when you encounter a finish that wants to chip easily the simple task of drilling a few holes may require more caution.

We can also encounter a problem when an electric guitar body is re-finished and the holes fill with paint.

A new Fender Stratocaster body prior to drilling screw holes.
This articles describes one way that I approach drilling holes in finishes which chip easily.

Place Trim Parts In Position


I start by taping the pickguard and trim pieces in the correct position so I can mark the layout of the mounting screw holes.
It is important to properly center and position our trim pieces to avoid drilling holes too close to the edge of the tremolo or routed cavity. Placing a drilled hole too close to the edge results in a thin wall around the screw hole which can cause it to fail. It is not uncommon for me to find factory screw holes that were placed so close to the edge of a cavity that the screw hole has cracked.
Stanley 69-122 6-1/16-Inch Wood Handle Scratch Awl
Mark The Spot

I use a sharp awl to make a small impression in the finish to mark the position of the screw holes. Drill bits have a tendency to walk and this impression serves as a "fence" to keep the drill bit centered.


Now I drill a small pilot hole that is much smaller than the hole needed for our mounting screws. This hole will keep our larger drill bit centered and give our countersink's tip a resting spot.

Using countersink to remove finish


Countersink To Prevent Chipping


Finish removed, ready for drilling
I use a countersink for the purpose of safely removing finish. The area should be only slightly larger than the diameter of the final, full size drill bit we need to use.


Cantankerous finishes can chip when the drill bit catches the edge of the finish and lifts it. Having the finish removed means our drill bit will not contact the finish when drilling the final hole.

Drilling The Final Hole


After measuring the screws I will be using I can choose the correct size bit to ensure a good fit. If in doubt, drill a test hole in a piece of scrap wood to test your fit.
Tape serves as depth gauge

Tape wrapped around the drill bit serves as a depth gauge to ensure the hole is not too shallow.

Luckily, not every finish creates a need for such overly cautious steps, but, I tend to treat them all as though it's a possibility and each instrument as though it was priceless.

Friday

Gibson LG-0 Plastic Bridge

I have to laugh whenever I read the words "special bridge", but that's what Gibson called their hollow, bolt on, plastic bridges which were used from the early to mid-1960's on their Gibson LG-0 small body guitars.
They were special alright. lol

Plastic Gibson bridge replaced with handmade ebony bridge
These bridges were not glued to the top, instead, 4 screws pass thru the bridge plate and screw into the bottom of the hollow bridge.

Screw holes


Compounding The Problem


Unfortunately the hollow plastic bridge wasn't the only issue this instrument had working against it. Couple the hollow bridge with a soft spruce bridge plate and ladder braces and you begin to understand why many have developed problems.
Excessive top belly (upheaval) 

Loose ladder bracing contributes to problem  

Here we see a Gibson LG-0 guitar which was braced with ladder braces (parallel bracing resembling rungs of a ladder), a spruce bridge plate (most are made with maple or rosewood) and bolt on plastic bridge.

A feeler gauge shows a loose brace which has really exasperated the condition. Without the structural support of the braces the top is free to pull upward and create what we call "belly". While a certain amount of top bellying is normal on aging acoustic flat top guitars, excessive bellying is often an indication of a problem.

Cracked screw hole

Plastic Likes To Crack & Warp


When a top deforms it makes it difficult for the bridge to conform to the changing shape. This can cause the top and bridge to part ways. For a bridge made of wood that means a failing glue joint. On our plastic bridge this means warping and cracking.

Often we see the delicate screw holes crack or completely sheer off as the aging plastic looses it's battle against tension. Gluing and repairing a cracked plastic bridge is a lesson in futility, especially when other issues are present.

A warped plastic bridge

An Interesting Re-Repair

This mahogany topped Gibson LG-0 came into the shop with a replacement bridge already in place. The problem? It was a Guild bridge! Obviously everyone who does guitar repair does not make replacement bridges from scratch. When that is the case they often resort to whatever they have on hand.

While this one certainly looked bad cosmetically, it also produced very poor intonation. The instruments saddle slot must be precisely located to allow the instrument to play in tune up and down the neck.

LG-0 that had a Guild bridge installed. Note the original screw holes.

With the Guild bridge removed I was faced with a large area where the finish and some wood had been removed. This area would have to be touched up as a complete top refinish was not in the budget.

I created an oversized ebony replacement bridge to not only cover some of the  previous damage caused by the Guild bridge, but it also added additional mass behind the bridge pin holes. Look again at the plastic bridges and see how closely the bridge pins sit to the back edge of the bridge. That may work on plastic but it isn't going to cut it on a wood bridge.
An oversized ebony bridge is used to conceal the damage done by the Guild bridge


See my photo gallery of bridge replacements